Archaeological Excavation Methods
- Mar 19, 2020
- 5 min read
Before we get into the details, I do need to stress that excavation is not only digging. We don’t just grab shovels and have at it. Excavation is destructive, we are literally destroying the site as we excavate it, so we need to make sure that proper methods and strategies are carried out. There are techniques, methods, and many other factors that come into play when approaching the excavation of an archaeological site. This is also a difficult video to make, because it’s so much easier to learn about these techniques on-site, actually digging. But of course, that is precisely why I made this channel, to make it accessible for everyone so I’m going to give it my all and hopefully we’ll all make it out on the other side.
With all of our research and material study, excavation is still the best method archaeologists have to get the information that we are most interested in. Which is: human activity at a particular point in the past, and how those activities evolved or changed over time. So you can say there are two main things we focus on when excavating: Horizontal and Vertical activity. When looking at how to differentiate between the two we can say that contemporary activities occurred horizontally through space, and these changes can be seen vertically through time. Sounds very sci-fi, I know! These horizontal slices give us a picture of one specific period, and the vertical layers provide the timeline. Because of this, we dig very carefully and we do it both ways.
So everything we find on one horizontal layer can be thought of to have happened at the same time. Finds and features uncovered in undisturbed contexts within the same horizontal space demonstrate that they all occurred at the same time. Of course, there are anomalies, sometimes things get tampered with both naturally and via human interaction over time, but we sort of have to trust this as much as we can so we don’t go crazy. This is also why we try to choose areas to excavate that would be reasonably undisturbed. If the site to be excavated is one that only has a single-period of human activity, this is super important or else a lot could be compromised. The singularity of this site though also makes it much easier to ensure that nothing has been tampered with. If the site has been occupied for thousands of years on the other hand, finding an undisturbed spot will be almost impossible. So in that case, you have to just play the cards you’re dealt and be very watchful, identify the disturbances, and try to reconstruct why it was disturbed and what exactly happened there.
So that’s the horizontal nature of excavation. Now let’s get on with the verticality of excavation. For this, we use Stratigraphy and the law of superposition. If you want to learn more about stratigraphy and all its fun laws, I made a fun video using Jell-O a while back, go watch it! But quickly, we just need to know that if one layer is found on top of another, the lower layer was deposited first and is therefore older than the one that lies on top of it. This is just for formation and deposition though. Let’s not forget that we can’t always assume that the finds in these layers are older because of that potential disturbance that we talked about earlier. Someone could have dug a pit way back when, or animals could have burrowed and caused some finds to fall to lower layers. Be vigilant, friends.
Let’s get into the actual methods now. There are a few different ways to excavate a site, and the choice of method will largely be based on the type of site, the geography of the area, time constraints, and also what we want to learn from the site. Some techniques favour the vertical dimension of the site, going deeper to reveal stratification. While others are more horizontal, which open up larger areas of a particular layer to reveal more spatial relationships between finds and features. Usually, archaeologists use a mix of both in different ways and no one method is going to be universally applicable. So let’s learn about a few of them now!
1. The Wheeler Box-Grid

This method tries to be the happy medium with satisfying both the vertical and horizontal ideals. It’s essentially a grid of squares laid out closely to one another, but with baulks in between. These baulks of earth mean that the vertical layers can be seen, traced, and correlated over the site. Once you get the general layout and ideas for the layers, some baulks might be removed to join the squares in an open excavation to expose any features that are of interest or importance. For example a road, or a mosaic. Some people argue against this method because the baulks may not be oriented correctly, could hold something of importance, and could prevent distinguishing the spatial patterning.
2. Open-Area Excavation
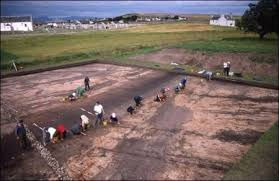
Image: scottishheritagehub.com
Some archaeologists who
the Wheeler box-grid say it’s better to not have these permanent or semi-permanent baulks, but instead to open up large horizontal layers, and only cut vertical sections at various angles where they are needed to clarify certain stratigraphic relationships. Everything is meticulously documented and reconstructed on paper. It’s a lot more of a demanding excavation process, but today we’re blessed with more advanced recording methods and computers that make it doable. This method is very popular in British archaeology and is very effective for single-period deposits that are close to the surface like Native American long houses.
3. Step Trench

Image: colleen-morgan.com
Now if we’re digging in places like the Near East, where we’ve got a stupid amount of occupation layers, both of the previous methods won’t work so well. The box-grid can get uncomfortable, and really deep, making the baulks dangerous, and the open area is too large to get to so many layers in one period. So here you would use Step-Trenching. What this is, is essentially you open up a large area at the top, and you gradually move down in a step formation. This open area also gradually gets smaller as you move down to maintain the stability of the trench walls. Of course, this means that you have a wider view of the upper layers, but only a very narrow one of the lower ones.
If the dig is under water, you might use something like a cofferdam, which involves sheet metal being put around the site, and you can then pump out the water to get to the features underneath. Of course this is very expensive and is only a viable option if the dig is well funded.

Example of a Cofferdam. Image: ediweekly.com
Of course there are other ways to excavate special sites like burial mounds and cave sites, but these are the basic, go-to methods that are most used and discussed in archaeology. No matter which method you use, the most important thing is documentation and proper methods of recovering finds. Because don’t forget, once you excavate something, it’s destroyed, we can never get back to that level again so we need to make sure everything is well taken care of.
So that’s it for today, friends. I hope you dug this episode and hopefully one day you can experience some digging for yourselves to see these methods first hand! As always, there’s aw write-up with extra links on my website if you want to know more, the link to that is in my description below.
Have any questions? Shoot me an email!
Looking to find out more? Click the Links Below!
Excavation Methods in Archaeology by Martin Carver
DOI: https://doi.org/10.1007/978-1-4419-0465-2_1494


1 Comment